


Introduction :
The approach for automating the web-view elements of the Hybrid App is made easier with ChromeDeveloperTool we will see the steps involved while inspecting the elements in this blog.
Pre-requisites:
Enable Developer Options
On Android 4.1 and lower, the Developer options screen is available by default.
On Android 4.2 and higher, you must enable this screen as follows:
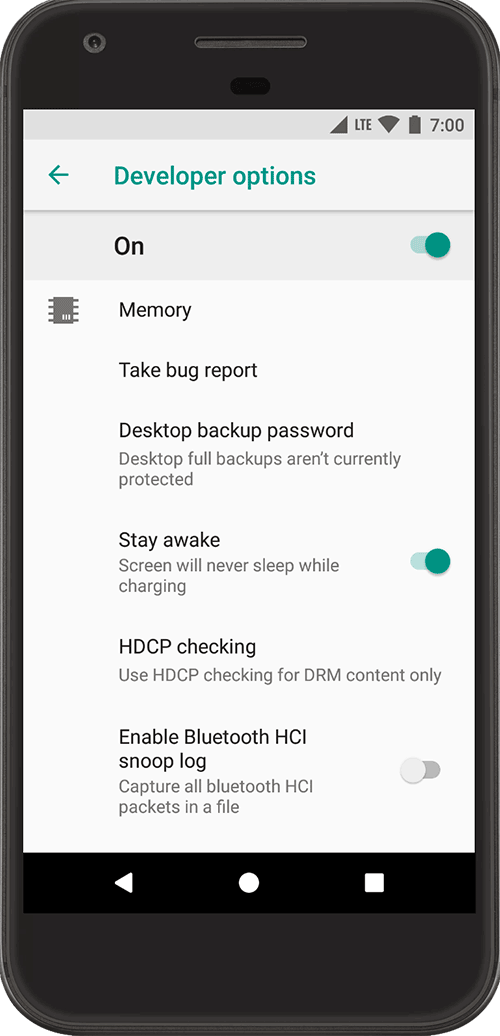
- On the real device(Android): Open the Settings app.
- (Only on Android 8.0 or higher) Select System.
- Scroll to the bottom and select About phone.
- Scroll to the bottom and tap the Build number 7 times.
- Return to the previous screen to find Developer options at the bottom.
Enable USB Debugging & Stay awake.
- Open the Developer Options screen on Android.
- Select Enable USB Debugging: Android device can communicate with your - development machine through Android Debug Bridge (ADB).
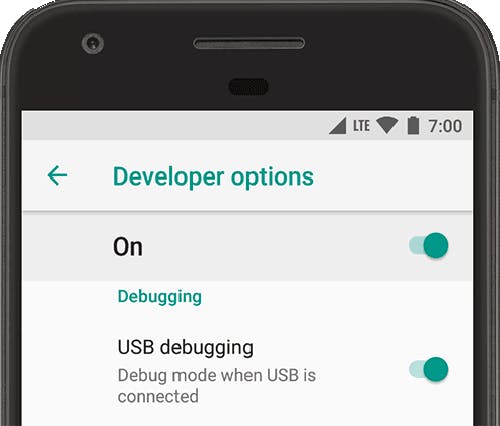
Stay awake: Sets your screen to stay on every time you plug it in.
Debugging option provides multiple ways to configure the device and to establish communication between the device and your development computer.
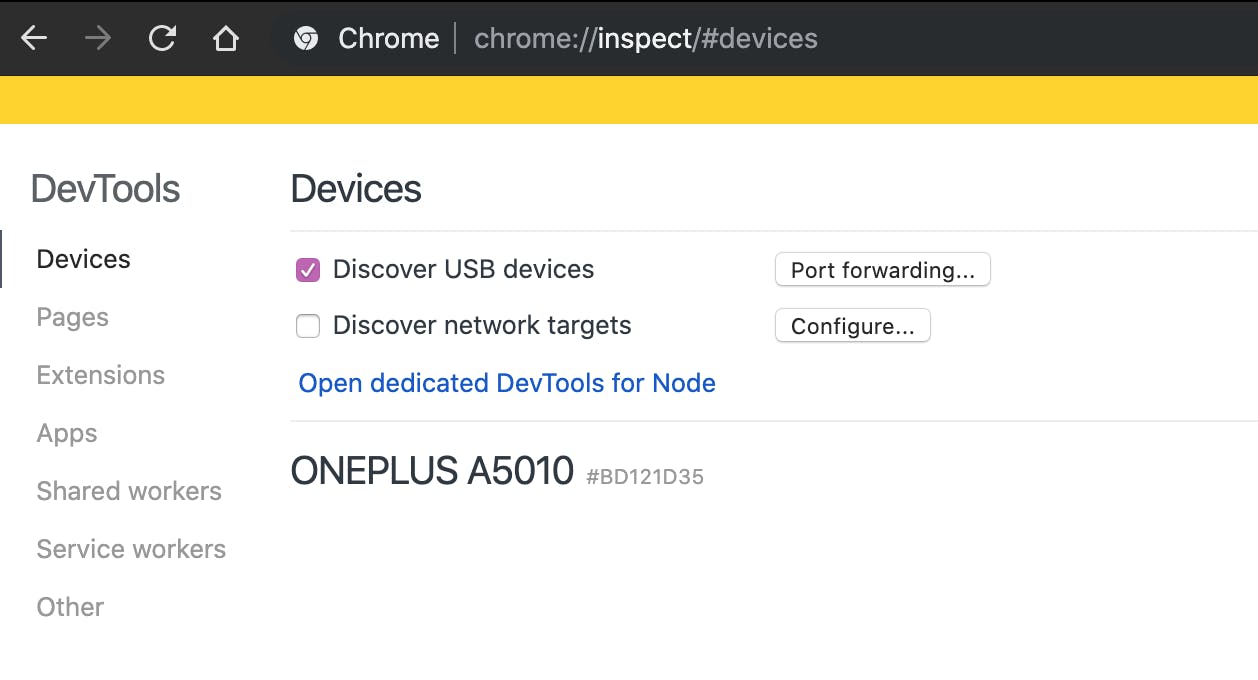
Enable Discover USB devices on Chrome:
- On the development machine, open Chrome Browser type chrome://inspect/#devices in the Address bar and hit Enter
- DevTools will open with Discover USB devices checkbox under Devices
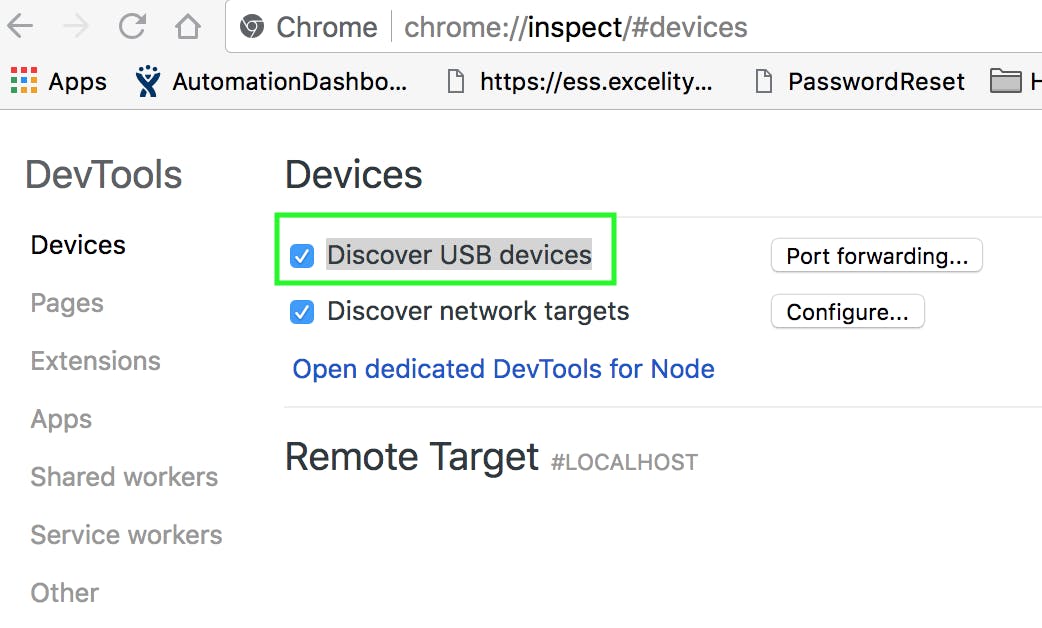
- Select the Discover USB devices checkbox
Allow USB Debugging From Device
- Connect the Android device directly to the development machine using a USB cable.
- The first time you do this, you usually see that DevTools has detected an unknown device. If your device is showing up as Offline, accept the Allow USB Debugging permission prompt on your Android device
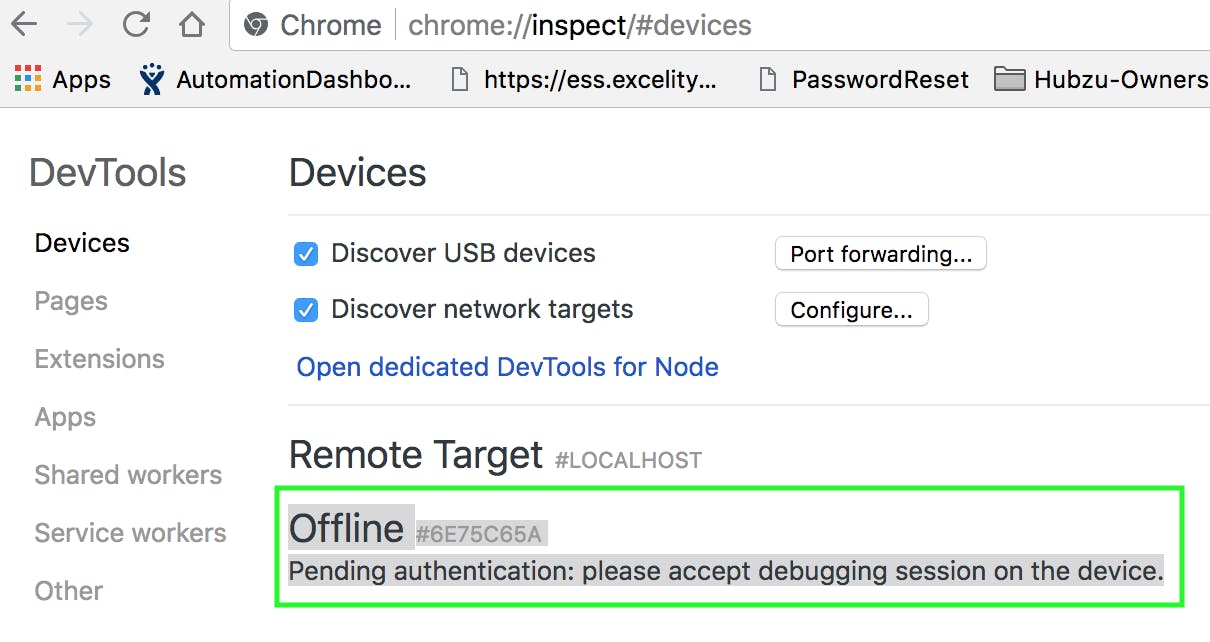
Once the Allow USB Debugging permission prompt is accepted on the connected Android device, the DevTools will display the model name/number of the Android device
Enable Web-content Debugging:
- Add this line in your custom Application class or in the Activity where the Web View is loaded(WebviewActivity) // if your build is in debug mode, enable inspecting of web views
if (0 != (getApplicationInfo().flags & ApplicationInfo.FLAG_DEBUGGABLE)) {
    WebView.setWebContentsDebuggingEnabled(true);
}
- Refer to the below section Enabling the WebView debugging for an app without source code if you don't have source code.
Push Debug APK to the device:
- Place the WebContentsDebuggingEnabled app/apk file on the Dev machine in a folder.
- Make sure that the Android device is connected the Dev machine via USB cable or Wifi
- Open terminal and type the following command to push the WebContentsDebuggingEnabled app file into the connected Android device
adb install /Users/.../Downloads/android_debug.apk
Once the installation of the app on the device is completed, a Success message will be displayed on the terminal.
- Re-confirm by checking App in the device
Get App list under DevTools:
- Make sure that the Android device is connected to the Dev machine via USB cable
- Open Chrome browser and type chrome://inspect/#devices in the Address bar and hit Enter. you should see the device listed under Devices
- Make sure that the Discover USB devices checkbox is enabled
- Navigate in the device to the installed WebContentsDebugging Enabled app
- Tap on the App to open it.
- Only when the App is opened(in the device), Chrome Browser's DevTools will list it under the device name
- Click on the inspect link to open the device screen in the browser
Inspecting the Device:
- By clicking on inspect the device screen will be displayed on the browser
- Click on the Inspect icon and hover on an object: the respective part of the DOM would be highlighted
- Right-click on the highlighted area and select Copy >> Copy XPath / Copy Selector
- In the Elements panel Press Ctrl + F to enable DOM searching in the panel
- Paste the copied XPath/Selector to validate the correctness an uniqueness OR
- Type in console the XPath like $x("//*[@Attribute='Value']") to evaluate and validate.
- Type in CSS selectors like $$("//*[@Attribute='Value']") to evaluate and validate. Check results returned from console execution.
Enabling the WebView debugging for an app without source code:
- Install the android development tools and make sure that all of the ADB tools are in your path in the terminal
- Install APKTool and update the PATH variable to include this.
- Connect the device(via USB) and sure that USB debugging is enabled for the device.
- Find the package name of the app under test:
- Open the Play store in browser: https://play.google.com/store/apps
- Search for the app:  "swiggy" in Play store search bar and hit enter
- From the search results click on the app(Owners Agent App) to be tested
- This would navigate the respective apps install app page
URL of this page(https://play.google.com/store/apps/details?id=in.swiggy.android)
- The URL contains the package name at the end: in.swiggy.android
- Alternatively, if you know the package name, pick it from the list of packages on the device with command:
adb shell pm list packages
- Find the location of the apk with the command:
adb shell pm path in.swiggy.android
If /data/app/in.swiggy.android/base.apk is the path, use adb pull /data/app/in.swiggy.android/base.apk to get this off the device
Decompile the app with apktool d base.apk. Everything will be output to a directory called "base"
- Search for the activity with the "LAUNCHER" intent filter in the AndroidManifest.xml file
- The launcher class would be in.swiggy.android.activities.HomeActivity
In order to get the Activity of the App run the below code in terminal
adb shell dumpsys window windows | grep -i 'any unique string from your Pkg Name'

The Output be like :

Window #8 Window{be9cd11 u0 in.swiggy.android/in.swiggy.android.activities.HomeActivity}:
    mOwnerUid=10801 mShowToOwnerOnly=true package=in.swiggy.android appop=NONE
    mToken=AppWindowToken{1ea47c7 token=Token{e98a506 ActivityRecord{38343e1 u0 in.swiggy.android/.activities.HomeActivity t362}}}
    mAppToken=AppWindowToken{1ea47c7 token=Token{e98a506 ActivityRecord{38343e1 u0 in.swiggy.android/.activities.HomeActivity t362}}}
    WindowStateAnimator{39533b0 in.swiggy.android/in.swiggy.android.activities.HomeActivity}:
Here First part of the output is package name: in.swiggy.android Second Part of output (which is after /) can be two things, in our case its: in.swiggy.android.activities.HomeActivity
so in.swiggy.android.activities.HomeActivity is our activity
Note: You need to have the apk installed and running in the foreground on your phone for this solution
- As the onCreate method always runs when the app starts, add the following lines of code at the end of the onCreate method on the launcher activity of the app
(=> base/smali/com/owners/agent/MainActivity.smali file just before the return of the method)
const/4 v2, 0x1
invoke-static {v2}, Landroid/webkit/WebView;->setWebContentsDebuggingEnabled(Z)V
- Run apktool b ./base to recompile the apk. It will be output to "./base/dist"
- Now we need to generate a key to sign the app. Run
keytool -genkey -v -keystore ./my-release-key.keystore -alias WebView_test_key -keyalg RSA -keysize 2048 -validity 1000.
The process will be self-evident. Note the password for later, and when you get to the question asking you if the details are correct type "yes"
- Sign the app with
jarsigner -verbose -sigalg SHA1withRSA -digestalg SHA1 -keystore ./my-release-key.keystore ./base/dist/base.apk WebView_test_key
- Remove the old version of the app with
adb uninstall in.swiggy.android
- Install the new version with
adb install ./base/dist/base.apk
Reference: Get Started with Remote Debugging Android Devices